Showing posts with label gift. Show all posts

Friday, July 24, 2009

FREE Big Shot Class

Would you like to attend my next Big Shot class. It is a FREE class. 

All you have to do is purchase $50 in Big Shot products from July 15 until August 15 from me or online at my website ginascardsandmore.stampinup.net, then click on SHOP NOW. 

The next class will be held August 23 from 1-3PM.
Don't miss out on this class. We will make some cute projects.

This basket was just one recent project made in my Big Shot Class. It used the Stampin' Up! exclusive dies Scallop Envelope and  Birds & Blooms.

It also includes the new Raspberry Lemonade Designer Series Paper and the In Colors Rich Razzleberry, Melon Mambo and Crushed Curry card stock.
 Hand crafted by Gina Dygert


Saturday, July 18, 2009

Give Thanks Framed Art

Here is  my latest Framed Art. 


Inspired by page 13 of the 2009-2010 Idea Book & Catalog
I changed the size to fit my 5 x 7 frame.  


Hand crafted by Gina Dygert


Have you ever wanted to learn how to create framed art?


Well I am offering a Framed Art class in my home 


August 16 from 3:30- 6PM 


The cost for this class is $20. We will create a new framed art you will want to proudly display. Class size is limited so reserve your space today. Frame and supplies needed are included. Contact me today at ginadygert@yahoo.com


Monday, June 29, 2009

Tall Tales Framed Art

I LOvE making framed art. It makes such a perfect gift to give a friend or two.

This particular Framed Art was made from Tall Tale Designer Series Paper. 
I was inspired by one of the pieces and
 decided to make a smaller version to fit into this frame. I also used Chocolate Chip Pattern Designer Series Paper, Rose Red and Whisper White card stock.

I wanted the giraffe to look as if he was floating over the hills in his Hot Air Balloon, so I layered the pieces using Stampin' Dimensionals

Stampin' Up! has a new stamp set called Animal Stories that features a giraffe just like this one, but about 2 1/2" tall.

If you would like to see what other new stamp sets are available in the new 2009-10 Idea Book & Catalog, go to my website www.ginascardsandmore.stampinup.net and click on contact me. Fill out the online form and I will send you a catalog.

Hand crafted by Gina Dygert


Sunday, May 31, 2009

Beautiful Little Baby Suitcase


This adorable baby suitcase was created for my neighbor who just had a baby. 

Congratulations Ruby. 

The suitcase is crafted from Pink Pirouette card stock and stripped ribbon. To get a cute pattern I used Itty Bitty Background stamp set.  Don't forget to use Sticky Strip to attach the ribbon.

The bunny is created from mostly oval 
punches: wide, large and small. I sponged each shape with Pink Pirouette Ink. 

The words beautiful little baby is a single stamp that Stampin' Up! offers on page 208 of the Idea Book and Catalog. 
If you would like to receive a copy of this wonderful idea book. Contact me by clicking here
and fill out the form. 
The latch on this  case is created with by the Designer Label punch and a Riding Hood Red button from the 
Button Bouquet Designer Buttons.

Inside I had half a dozen cute as a bug onesie cards and matching envelopes.  

I love the little lady bug from a dormant set called Bugs & Kisses.

Hand Crafted by Gina Dygert

Tuesday, May 12, 2009

More Birthday gifts


This was my gift from Anna

She used the Bella Rose Designer Series Paper on both the card and box. 

The card uses the On Your Birthday stamp set, Oval punch, Scallop oval punch and the Scallop Edge punch

I absolutely love how she used the Stampin'Up! Birds and Blooms Sizzlits dies along with the butterfly from the Great Friend stamp set to adorn the top of this adorable box.
What a wonderful way to use the Cheers to You stamp set.

Debbie made this refreshing gift for me. I love the cute little drinks. And can't forget the chocolate. There was more chocolate but I ate some before I took the picture.


She also used the Tart & Tangy and Heard from the Heart stamp sets on my birthday card.

Monday, May 11, 2009

Birthday Gifts


Lorrie made me this adorable Daffodil card and Framed Art. 

It is so pretty.

For the card and framed art she used the Inspired by Nature stamp set.

Fabulous friend is part of the Oval All stamp set.

Birthday Wishes is part of the Elegant Cheer stamp set.

I love the daffodils. They are made using the 5 petal punch, Boho Blossom punch and crimper.

Faith made us all these matching frames. 

Too cute! 

It definitely makes me smile. 

It features the Cheep Talk stamp set.


Look at the  flower on the outside of the frame.
 She used the words Its your day  ENJOY! from the On Your Birthday stamp set.
This box set was made by Norma

I absolutely love it!


I absolutely love anything with butterflies! 

My birthday card features the Garden Greetings stamp set.
The box set and cards use Great Friend  and Oval All stamp sets

I just love these colors combinations. Baja Breeze, Chocolate Chip and Kraft.

Tuesday, May 5, 2009

Bella Rose Paper Holder with Cork Buttefly

 
Happy Birthday Anna!

When trying to think of what to make for Anna's Birthday gift, I decided to look through the Stampin' Up! Spring & Summer 2009 idea book & catalog
On page 196 I saw this adorable paper holder and decided to recreate it.

I used the Stampin' Up! Beautiful Butterflies bigz die to cut the butterfly out of corkboard. 
Yes the dies cut through it just fine.
The box is created from left over cardboard and Bella Rose Designer Series Paper.


crafted by Gina Dygert

Monday, May 4, 2009

Pink Flamingo Framed Art


Happy Birthday Fairle!

Fairle was one of the Birthday girls on Saturday. 

Earlier in the week, I had asked her what she wanted for her birthday. 
She told me all she wanted was something/ some kind of art made with Pink Flamingo  Designer Series Paper.
 

This is what I came up with. 


I used markers to ink up these words from the All Holiday stamp set

I cut and layered the different pieces. 

Then using the 5/8" Real Red Grosgrain ribbon and new grommets I completed my gift.


Hand crafted by Gina Dygert

Friday, March 27, 2009

How did I make my weaved basket from paper?

Several have asked how I made my basket
Well, I used a quick simple technique to get the weave started.


First I placed 4 strips


then 4 more 


then 3 more 


and finally I only had to weave the last 3. 


Pushing them all into the center. 


Flip it over. Take a piece of 3 1/4" square to cover the centers and make it easier to fold the strips up. 


Now you are ready to start weaving strips around the box. 


I adhered each corner before turning to the next side this will give it strength.


After doing 4 strips high


I then cut off any excess paper on the top so I could place 4 Scallop envelope together as a box inside by basket. To finish off this basket I used a 3/4" strip folded in half to go around the top edge. Add the rest of your embellishments (ribbon, brads etc). 


Happy Crafting 
:)


Hand Crafted By Gina Dygert

Wednesday, March 25, 2009

Easter Stamp Camp

  Space is still available.
On Sunday March 29, I will be having my
Easter Stamp Camp

 We will make 5 adorable Easter projects.You won't want to miss out. 

The Stamp Camp Fee is $25 (only $20 to my club members).

Here is a peek at one of my projects. It features the bunny from the Eight Great Greetings stamp set from pg 11 of the Occassion Mini catalog.


Remember Sale-A-Bration ends March 31st.Don't miss out on earning free stamp sets, ribbon and Designer Series paper.


Hand crafted by Gina Dygert

Tuesday, March 17, 2009

Butterfly framed art

Recently I made two of these cute and simple framed art to give to two of my friends who share the same birthday. 


           To reproduce this art you will need the following stamp sets:

Dreams Du Jour (words)
Simple Friendship (large butterfly)
Branch Out (small butterflies)
Pocket Silhouettes (plant)


Hand crafted by Gina Dygert

Easter Basket


I have made several of these adorable baskets. They will be used as gifts and door prizes for a few differnet events. I am even saving one to be used as my blog candy to be drawn at the end of the month. So don't forget to comment today to get entered into the drawing.

This idea was cased from MJ's blog.
Thanks for the inspiration!


This was a rather simple project when I figured out what I was doing. Using Sale-A-Bration stamp, paper and ribbon I was able to create my own little basket. 

Delicate Dots Designer Series into strips of paper and weaved them together to make this adorable project. 


crafted by Gina Dygert

Monday, March 9, 2009

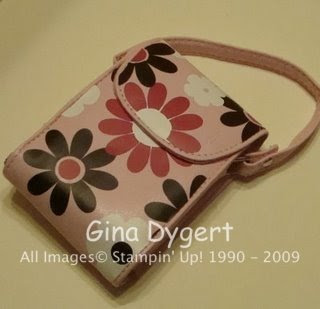
Flower camera bag


I recently purchased this plain camera bag for my new digital camera. 

It lacks personality, but with a little bit of creativity, look at what I made. 

Using White and Chocolate Decor Element sheets I cut shapes with my Stampin' Up! Basket and Blooms Bigz xl die and circle punches.

Putting those shapes with Rose Red and Chocolate Chip Flower Decor Elements I was able to create a one of a kind camera bag.
 
I am truly proud to carry my camera in.

Notice how when it is open 
or shut it has a beautiful flower in the center.

crafted by Gina Dygert

Saturday, February 28, 2009

Raspberry Tart Thanks Purse

In my Super Sunday class we made this cute little Thanks purse.   
To create this cute purse you start out with 2 Mini Square envelope. The inside of the envelopes will become your pockets to place a cute little card. Using many pieces of card stock you cover almost all of the envelopes. This will give the purse some substance. 
I choose the Raspberry Tart Designer Series Paper to layer over the coordinating colors of card stock, Kiwi Kiss, Rose Red and Cameo Coral
I also used some Regal Rose card stock
With the assistance of the Sweet Stems and Thank You Kindly stamp sets I was able to creatively decorate the purse. 
Using an oval (Ovals Sizzix Die) as a back drop I put this flower cut from some Raspberry Tart Designer Series Paper.

What a great way to tell some one Thank you! 

Hand crafted by Gina Dygert


Wednesday, February 25, 2009

Birthday in a Box


A perfect surprise to keep in your desk drawer for the next birthday.

 This Birthday in Box is surely going to delight whom ever you choose to give it to.

This box is 
crafted with Pacific Point and Kiwi Kiss card stock

The party hats are part of the Party Hearty stamp set


I had my husband cut the
 wood from the long strip of wood into 5 pieces, so I could mount each party hat separately. 
This allows me to stamp a different hat into different colors giving me a cute effect. 

 I used the new eyelet border punch to edge the top of the box.

Placed a cupcake, box of matches and a candle inside. 

Tied the box up with Tangerine Tango 5/8"Striped Grosgrain ribbon

Don't the cute tag that is punched out with the scallop circle punch. The celebrate you image is also part of the Party Hearty stamp set.


hand stamped by Gina Dygert

Monday, February 16, 2009

Rooster Coaster Framed Art

Here is another of my coaster framed art.The Rustic Rooster stamp set is a Level 2 Hostess set. 
It comes with a Rooster that I stamped in Close to Cocoa Classic ink then used the following Stampin' Markers:

Old Olive for blades of grass
Ruby Red  for the rooster's comb and wattle
Pumpkin Pie for feet and beak

The stamp set also includes a french script stamp. 
But the script is not big enough to cover the entire coaster so I have decide to cover it with the En Français background stamp stamped in Sahara Sand Classic Ink.
 
I finished up the coaster by sponging some Close to Cocoa and Creamy Caramel Classic Ink around the edge. 

I punch holes in the corners with the Crop-a-dile and attached it to the window screen with some brads. I used a staple gun to staple the screen to the back of the wooden frame. 

This always makes a cute gift. This one is going to my friend Michelle, who is also one of my neighbors.
 :)


Created by Gina Dygert

Saturday, February 7, 2009

Cotton Ball Box

During my latest trip to IKEA I found an adorable cotton ball box. (I sure do love that place)
Of course I could not just leave it plain. I decided to decorate it with some Rose red  and Chocolate Chip flower Decor Element  and White Decore element sheets.  What a quick cute way to dress up this box. 

Now to wrap it up and give this to my friend for her birthday. I know she will LOvE IT! 
Happy Birthday Norma. 

Created by Gina Dygert